|
<< Click to Display Table of Contents >> Introducing Matt's Track Editor |
  
|
|
<< Click to Display Table of Contents >> Introducing Matt's Track Editor |
|
If you have sampled an album, recorded an audio stream from the web, or made a live recording, you will usually have many 'tracks' in a single huge file. But how can you split this multi-gigabyte file into separate tracks? How can you cut out the bits you don't want to keep?
Matt's Track Editor makes it easy to split your recording into separate tracks and to define which parts are to be discarded. The desired tracks can be saved into MP3, WAV or FLAC files, and optionally added to your MuMan music library. You can also take the audio track from some video files such as ".mp4" and ."mkr" formats.

Matt's Music Recorder is usually used to create the recordings for the Track Editor. But any audio file - usually a lossless WAV, FLAC or WavPack file - can be edited. It is not recommended to edit compressed audio files (MP3 etc) because sound quality will be lost when it is converted to and from the uncompressed format used by the Track Editor.
Recording files can be big. A typical album, sampled at 96kHz, will use about 3 GigaBytes (3000 MegaBytes), but this is not usually a problem on modern computers, which probably have a 1 TeraByte solid-state drive these days. For the highest possible quality, Matt's Music Recorder (MuRec) always uses the 32-bit floating point format for its samples.
The main editor features are described below. See also the Main Window page for more details.
Here's a quick-start summary of the procedure. Details can be found below.
1. Open a recording file, either from Matt's Music Recorder, or by pressing the 'Open File...' button and choosing a file.
2. Use the track markers to delimit each track in the waveform view. MuEdit inserts track markers automatically the first time the file is opened.
3. Select which tracks you want to save using the check-boxes in the Tracks view.
4. If it's a Various Artists album, check the 'Various Artists file name format' check-box. This allows you to define a separate artist for each track, see below.
5. Enter the track numbers and track names in the Tracks view. For Various Artists albums you can also enter the track artist name here, e.g. "Track Name / Artist Name".
6. Enter the Artist and Album names. These are used as the directory and subdirectory names when the tracks are saved. Note: 'Directory' means 'Folder'.
7. Select the Genre, e.g. 'Rock' and enter the album's 'Year' if you know it.
8. Select the file format, 'MP3 320K', 'WAV 24-bit', 'WavPack 16-bit' etc.
9. Enter the root 'Destination Folder' for your music files, e.g. "D:\Music" or "C:\Users\<username>\Music". The destination directory for the tracks is "<destination_folder>\<artist_name>\<album_name>".
10. Select the Album Art, and what you want to do with it. See details below.
11. Press the 'Save Tracks!' button.
12. Go down the pub and tell everyone about this amazing software, so they all rush home and buy it.
Tracks are delimited by adding track markers to the waveform view of the file. The markers are automatically added when the file is first opened. The markers are placed wherever there is a 2-second (or longer) gap in the audio. For albums (LPs and CDs), they are usually placed automatically in the right place, but it is easy to to change them. The markers can be dragged using the mouse. Markers can also be added or removed. The Track list is updated while you work.
The Track list shows the track numbers and track lengths (mm:ss), and you can enter the track names and track numbers. The checkbox on the left indicates if this track (or section of audio) is to be saved. Uncheck it if you don't want this track or you want to discard this section of audio.
There are three types of track marker. 'Start' (green) indicates the start of the first track. 'End' (red) indicates the end of the last track. 'Track' markers (orange) indicate the start/end of each track between the Start and End markers.
Markers are added and removed using the context-menu commands. Right-click the mouse in the waveform view to display the context menu. You can also move the markers by dragging them with the mouse. Move the mouse pointer over the marker until the hand cursor is shown, hold the right-hand mouse button down and drag the marker to the left or right until it is centered in the space between tracks. When dragging a marker to the left or right, the zoomed waveform view will scroll automatically.
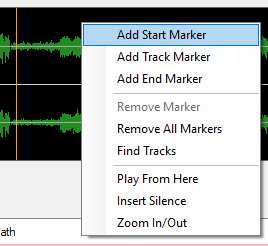
Note: Track markers are not stored in the recording file, they are stored in a separate temporary file called "<filename>.info" along with the other data. They are restored when the file is re-opened.
To accurately place the markers, you will usually need to zoom in to see the waveform in more detail. To do this, simply double-click with the mouse on the part of the waveform you want to view. Double-click again to zoom out. You can also press the 'Zoom In/Out' button. When not zoomed in, the entire waveform is shown in the width of the view. When zoomed, you will see between 1 and 2 minutes of the waveform, depending on the window size.
When zoomed, you can drag the waveform view to the left or right by clicking on it and dragging it with the mouse.
The waveform view's context menu contains a 'Play from here' command, or you can press the 'Play/Stop' button to stop/start playback from the beginning. While playing, a white vertical bar indicates the location being played. In zoom mode the waveform view scrolls as it plays.
When the mouse pointer is over the waveform view, a text below the view shows which track the mouse pointer is over, e.g. Track: 1. All Along The Watchtower, 3:20. This is useful to know where the track markers are, especially when the waveform is zoomed. The track number and name are taken from data entered in the Track List, and the duration is calculated from the track marker positions.
To the right, in green, is an indication of the position (mm:ss) in the entire recording.
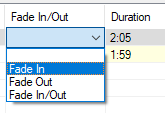
The Tracks list is a spreadsheet-style editor for the track number and track names, with a 'Fade In/Out' column that has a drop-down list of fader options.
You can navigate in the list by using the arrow keys. The active cell is highlighted with a black border, and the selected row is highlighted with a blue background.

You can use drag-and-drop to move track names around, and even copy/paste all the track names at once. This is is described here.
If saving to MP3 or FLAC files, you can embed a picture of the album in each file. WAV files do not support this, but you can save an 'AlbumArt.jpg' file in the music directory. The album art is displayed by MuMan when you play or select a track in your library.
If you already have an album art file, you can simply drag-and-drop or copy/paste the file into the Album Art box. If you fill in the Artist and Album names then you can press the Search Internet... button to open a browser window containing pictures found by the Google picture search. Drag and drop one of these into the Album Art box and check the option to store in the file and/or copy to the album directory. For WAV files you can only copy to the album directory.
Embedded pictures ('Put image in files' option) should normally not be larger than about 300K otherwise the music file size will be noticeably increased. If copying to the album directory, you can have much larger files. which will produce a better quality image when viewed on a high-resolution screen (UHD, 4K).
Tip: You can use 'Paint' to edit the album art. Open the web page which contains the image. Press Alt+PrtScn to take a snapshot of the window. Open 'Paint' and do 'Paste'. Now you can crop the image to the album art. Do 'Select All' and 'Copy', move to the Track Editor and paste the image into the Album Art box. You can also save the image directly to the album directory as file 'AlbumArt.jpg'.

The size of the image (e.g. 'Size=123KB') is shown below the Album Art box. If it's too big you can drop or paste a smaller thumbnail image.
Use the track markers to define the section as a 'track', then uncheck the checkbox for that 'track'. You will probably need to re-number the tracks.
If you are cutting out part of a track, to avoid a sudden change of volume, you may want to fade in at the start, and/or fade out at the end. This is done from the track list by clicking in the Fade In/Out column of the track and selecting the fade option from the drop-down list. You won't see fade action in the waveform view, it is applied only when the tracks are saved.
Some albums contain tracks by different artists. In this case, the single 'Artist Name' entry field is not sufficient because you need to define a different artist for each track. To do this, check the 'Various Artists file name format' checkbox. The 'Artist Name' then becomes the directory name for your 'Various Artists' albums. This would typically be something like 'Soundtracks' or 'Various Artists'.
The artist name for each track is entered in the 'Track Name' column, separated from the track name by "space-forward slash-space", "track name / track artist name", e.g. "All Along The Watchtower / Jimi Hendrix".
The format is verified before the tracks are saved, incase you have forgotten to enter the track-artist name, or have entered it incorrectly.
Note: If 'Various Artists file name format' is not checked, then it will assume the artist name is part of the track name, and will replace the '/' with '-' because '/' is not valid in a file name.
Files are always stored with this file name format:
"destination_directory\artist_name\album_name\tt_track name_artist name.ext"
For example, "D:\Music\Acoustic Alchemy\Natural Elements\01_Drake's Dream_Acoustic Alchemy.wav".
This is the format used by Matt's Music Manager.
If the Track number is blank, then the 2-digit track number and the following underscore ("tt_") are not present.
For Various Artists albums, the 'track artist name' at the end of the file name is the artist name entered into the Track Name field, see above.
MuEdit uses a subset of the hundreds of possible genres, which hopefully makes it easier to choose an unambiguous music style. For example, instead of "Dark Death-Metal", simply choose "Metal". See MuMan Genres for more details.
Tip: If you are using MuMan, then you can also assign a 'Mood' later. e.g Instead of "Heavy Rock", choose "Rock" and then set the Mood to "Heavy".
Sometimes parts of a recording may be too quiet. You can amplify an entire waveform by using the 'Normalize Waveform' feature. This first scans the entire waveform to find the loudest part, then uses that as the maximum volume level, amplifying the rest of the waveform accordingly. A new file is created with the subscript "-1", "-2" etc. and this new file is opened in the Track Editor. Your original recording is unchanged, and can be re-opened if necessary.
If the recording is already at the maximum volume (the loudest part is already at 100%) then you will not be able to amplify it further.
Tip: If there is a mixture of loud and quiet tracks, then the quiet tracks cannot be amplified beyond 100% of the loudest section. If you want to amplify certain tracks more than others, then first save these tracks as separate WAV files, then open each file separately and do 'Normalize Waveform' to amplify each track to the maximum.
Select the track file format using the 'File Type' combo-box:
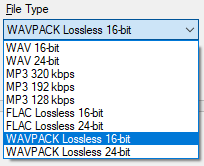
If the recording is 24-bit (check the 'Properties' of the sound source on Windows Sound Settings), then you can save it as a 24-bit uncompressed WAV file, or a lossless compressed FLAC or WavPack file, for the highest quality. The 16-bit WAV, FLAC and WavPack are also good - use these if the original source was 16-bit. Saving as a 320/192/128 kbps file will lose sound quality, but you will have much smaller files which are better for mobile devices.
Hi-Fi enthusiasts will probably want to save the files in and uncompressed (WAV, the largest file) or lossless (FLAC Lossless or WAVPACK Lossless).
MP3 files are compressed, so some of the sound quality and depth is lost, but if you don't have a real Hi-Fi then you probably won't be able to hear the difference. MP3 320 kbps (320,000 bits-per-second) is usually used, but if the tracks are to be played on your phone or matt-pod, then MP3 128 kbps is usually good enough, and it's about one third the size of the MP3 320 kbps format. The MP3 files created are "variable bit rate" files (VBR), up to 20% smaller than the fixed bit rate (FBR) versions, but with the same quality.
One thing to note is that for WAV, FLAC and WAVPACK files, the file is always saved with the same sampling rate as it was recorded because changing the sampling rate from say 48kHz to 44.1kHz would affect the sound quality (the samples would have to be extrapolated to change the frequency). For MP3 files, the sampling rate is less significant, but it should be 44.1kHz (the CD sampling rate) or above for the best quality.
Tips: There is no need to save the tracks in a quality that is better than the quality of the original recording. For example, if the recording is 16-bit, then saving it as a 24-bit FLAC will not improve the sound, it will just take up more space on your disk. For the smallest files, do not embed large Album Art images in the file, keep the image size below 250KB (20 to 50KB is usually enough for a thumbnail image).