|
<< Click to Display Table of Contents >> Track Editor Main Window |
  
|
|
<< Click to Display Table of Contents >> Track Editor Main Window |
|
This describes the elements of the Track Editor window. See the Introducing the Track Editor for details of how to use the editor.

At the top of the window you will see details of the currently open recording file. MuRec usually records files in the 32-bit IEEE Float format for the highest quality. The sample rate can usually be selected depending on your computer's hardware. See Matt's Music Recorder for more details.
This is a representation of the recording file's waveform. The view initially shows the entire waveform, but you can zoom in (10x) by double-clicking in the view where you want to look more closely. Double-click again to zoom out. For example, double-click on a marker to zoom in and see exactly where the marker has been placed:
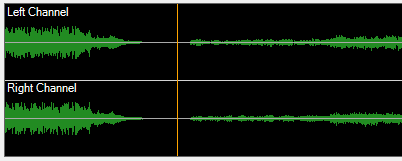
When zoomed, the waveform can be scrolled left or right by clicking in the view and dragging the waveform. Track markers can also be dragged to new positions.
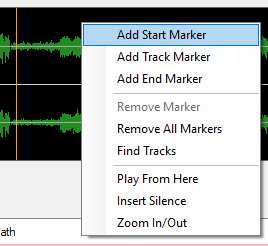
Right-click in the view to open the context menu:
Note: Track markers are not stored in the recording file, they are stored in a separate temporary file called "filename.info" along with the other data, which are restored when the file is re-opened.
This does the same thing as double-clicking in the waveform view. It magnifies the waveform by 10x so you can more accurately position the track markers.
Starts playing the waveform from the beginning, or stops playback if it's already playing. To play the waveform from any point use the context-menu's 'Play from here' command which plays from the location where the right-hand mouse button was clicked.
The check-boxes on the left define which 'tracks' will be saved. When a track has been saved, the check-box is unchecked to so won't save the same track twice.
The 'Track Number" and 'Track Name' fields can be edited.
- The fist click on an unselected cell will select the cell, the second click will open the cell for editing.
- Click in the selected cell to open for editing, the caret is placed in the existing text at the location where you clicked, so new text can be typed.
- Select the cell with the arrow keys and start typing, the existing text is replaced by the characters you type.
- Click in the cell to the right of the existing text to append text.
- Press Enter to store the text and move the selected cell to the next track name or number. In this way you can enter the track names very fast, e.g. Track Name 1 - Enter - Track Name 2 - Enter - ...
If you need to move the track names around because a track was inserted or removed, you can click and drag the names from one track to another.
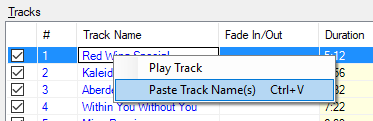
You can also drag-and-drop or copy/paste multiple (or all) track names. For example, you could copy/paste the track names from an Amazon or Discogs web page into Notepad and edit them there. Remove the track numbers and other unwanted text. Each track name should occupy its own line, with no blank lines in between. Now do the following:
- Select all the lines and copy them to the clipboard ('Copy' context-menu command or Ctrl+C). Select the first track name cell in the Track Editor and paste the track names into the first cell using Ctrl+V or the context-menu's 'Paste Track Name(s)' command.
OR
- Drag-and-drop all the selected lines from Notepad into the first track name cell. This copies all the track names.

I suspect you can guess what this means, but what does it do? When the tracks are saved, the artist name is used as the name of the directory below the 'Destination Folder'.
If it is a 'various artists' album ('Various artists file name format' is checked), then this is only used as the subdirectory name, such as 'Various Artists' or 'Soundtracks'. It is not used for the actual track-artist name, these are entered in the Track Name cells, separated from the track name by space - forward slash - space, "track name / track artist name", e.g. "All Along The Watchtower / Jimi Hendrix".
Not all characters are valid in directory (folder) names, so these characters are converted to spaces in the directory name: \ ? * :
In a non 'Various Artists' track name, / is converted to -
This, believe it or not, is the name of the album. It is used as the subdirectory of the artist directory, so all the albums released by an artist are stored in the artist's subdirectory.
Not all characters are valid in directory (folder) names, so these characters are converted to spaces in the directory name: \ ? * :
and / is converted to -
All your music files are usually stored in a single 'Music' directory, e.g. 'C:\Users\<user name>\Music' or 'D:\Music'. This is the destination folder (directory). If you are using MuMan, then this should be the Music Files directory used by your music library.
MuEdit uses a sub-set of the hundreds of possible genres, which hopefully makes it easier to choose an unambiguous music style. For example, instead of 'Dark Death-Metal', simply choose 'Metal', or for 'Heavy Rock', choose 'Rock' and later you can set the 'Mood' to 'Heavy'. See MuMan Genres and Moods for more details.
The release year of the album. Normally you would enter a 4-digit number, like '1965' or '2001', but you can actually enter any short text, like '06/2007' if you also want to show the month.
Tip: Think about using the release year of the original album, not the year of the "re-mastered" version (where they just made the drums louder) which was released 20 years later. Check out Discogs or MusicBrainz if you want to find out more about an album's history. MuMan has a command for this.
Search Internet... button
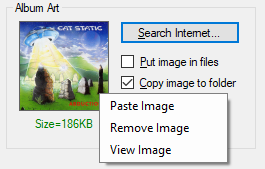
Once you have entered an Artist and an Album name, you can press the 'Search Internet...' button to do a standard Google picture search for the album cover image in your browser. See Choosing Album Art for more details.
You can drag-and-drop or copy/paste an image or image file into the Album Art box. Sometimes drag-and-drop does not work if the website restricts access to the image file (which may be copyright) - but in that case you can just use copy/paste instead. Sometimes you may want to use just a small thumbnail image if it is to be embedded in the track files.
For WAV files which do not allow embedded images, or if you have a hi-resolution (4K) display, you may want to use a very large image file. In this case get the largest image you can find, and use the 'Copy image to folder' option.
A text below the image shows how big it is, e.g. 'Size=186KB'. If embedding the image in small MP3 files, you may want to keep the image size below about 300KB (unless you are using one of the new MattLabs 100-PetaByte Holographic drives for your music files).
For a Various Artists track, it will search for the track artist if the track is selected in the Tracks list, and the "track name / track artist name" has been used.
For FLAC, WAVPACK and MP3 files, you can embed the Album Art image into the music file. So you should use this option unless you want the smallest possible file size (which is usually unnecessary these days). WAV files do not support embedded images, so if you are saving your tracks to WAV files then you should check 'Copy image to folder' instead, and use the biggest image file you can find, especially if you have a 4K high-resolution screen.
Check this to copy the image file into the Album directory, with the name 'AlbumArt.jpg'. MuMan always displays this image in its 'Album Art' window when the album is selected or a track from the album is playing in Matt's Music Player. Use this option if you are creating WAV files, these cannot have embedded images.
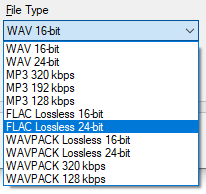
See the description of file types. WAV, FLAC and WAVPACK files are always saved with the same sampling rate as it was recorded because extrapolating the samples to a different sampling frequency would affect the sound quality.
This checkbox allows each track to have it's own 'track-artist' name. The 'Artist Name' entry defines only the directory name, e.g. use 'Various Artists' or 'Soundtracks'. The track artist name is entered in the 'Track Name' column, separated from the track name by space - forward slash - space, "track name / track artist name", e.g. "All Along The Watchtower / Jimi Hendrix". See the Introduction for more details.
If Music Manager (MuMan) is running, and the 'Destination Folder' is MuMan's Music Files directory, then this check-box is enabled and checked by default. If checked, then when the tracks are saved they are automatically added to the open music library. If MuMan is not running, the tracks cannot be added automatically, but you can always use MuMan's 'Add Music Files' command later to find the new tracks and add them to the library.
Use this to open a new recording file for track editing. A 'Browse For File' dialog box is opened so you can select a recording file. As when closing MuEdit (see 'Close' below), all the entered data is saved, and it is restored if the recording file is opened again. You can also open certain video files to extract the sound track, such as ".mp4" and ".mkr" files.
Note: It is not recommended to edit compressed audio files (MP3 etc) because sound quality will be lost when it is converted to and from the uncompressed format used by the Track Editor.
This feature will amplify a recording up to the maximum volume level and creates a new audio file. See amplifying a recording.
The 'destination folder' is the directory into which the tracks will be saved. This is created by combining the 'Destination Folder' with the 'Artist Name' and 'Album Name' in this way: "destination_folder\artist_name\album_name"
For example, "D:\Music Files\3 Legged Money\Play No Evil".
Press this button when you are ready to save the tracks. MuEdit validates everything before it starts the save. All the required data must be present, track names present, destination file names must be valid, various artists albums must have track-artist names 'track name / artist name', etc. You will be warned if the destination files already exist and would be overwritten with the new files. If the data is invalid, then you may not be able to create the track files until it's corrected.
Saving the files, and converting to MP3 or FLAC, will take several seconds or minutes, depending on the number and size of tracks, and the speed of your computer. During this time the 'Save Tracks!' button text is changes to 'Stop Save'. Press this button again to abort the save.
Closes the Track Editor. All the entry-field texts and checkbox settings, track names, album art, etc. which you have defined are saved in a temporary file called 'filename.info'. They are restored if you re-open the same recording file.