|
<< Click to Display Table of Contents >> Library Files |
  
|
|
<< Click to Display Table of Contents >> Library Files |
|
The 'library file' is database which contains tables of genres, moods, artists, albums and tracks. The library file has the file type ".muman2". This file type is registered with Windows to be opened by MuMan2.exe when Matt's Music Library Manager Suite is installed.
Normally you will have just one library file for your music collection. This library is automatically opened when you start the Music Library Manager, because it always reloads the library which was open before.
If you just want to scan a drive to see what music is on it, you could create a new empty library and scan the drive with Add Music Files.
If you export many of your music files to another drive, you could create a new library file to go with them. You could even copy Matt's Music Library Manager Suite onto the drive so it could be used when plugged into any other Windows 10 computer.
Use 'Library Management > Open Library', and choose an existing '.muman2' file.
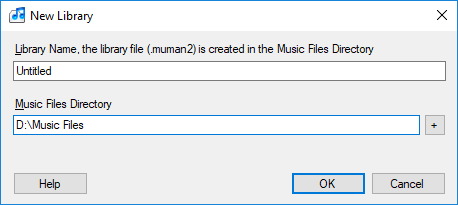
The 'Library Management > New Library' command creates a new empty library file. Enter a 'Library Name' and the 'Music Files Directory'. When OK is pressed you have the option to add the music files in that directory to your new database. Press 'Start Scan' to find the music files which are already in the directory, or 'Cancel' to do it later.
You can save the new database to a different file name later.
Tip: If you use a top-level directory, you must have a backslash after the drive letter, e.g. "F:\". But it is not recommended to use a top level directory, a subdirectory is best. But for testing you can do it, because you can scan all the music files on an entire drive.
Adding existing music files to the new library:

MuMan will always ask you to save a modified library before you close it. If the library name is still 'Untitled', you will be asked to give it a library file name.
At any time you can use the 'Library Management > Save Library' or 'Library Management > Save Library As...' commands, or just press the shortcut key Ctrl+S.