|
<< Click to Display Table of Contents >> Introducing Matt's Music Recorder - MuRec® |
  
|
|
<< Click to Display Table of Contents >> Introducing Matt's Music Recorder - MuRec® |
|
If you haven't digitized your enormous LP collection yet, then you better get started now! MuRec will record from any of your computer's digital audio channels and saves it as a high-quality lossless WAV file. You can then use Matt's Track Editor to split the recording into separate tracks and save them as FLAC, WAV, WavePack or MP3 files, and optionally add them to your Music Manager library.
You can also record sound while it's playing, so you can play an album on your favorite streaming service and record it digitally with broadcast quality.

To digitize your LPs (and your 45s or 78s, if you're old enough), you will need a USB Audio Interface which also has an 'Analogue To Digital Converter'. This should have a 'Phono' input for direct connection to your turntable; or a 'Line' input for connection to you Hi-Fi amplifier's output, then you can use your Hi-Fi as a 'pre-amp' for the Phono input from the turntable.
The phono input is for connection directly to your turntable's pickup cartridge. This input is very sensitive and handles the 'RIAA equalization' which is necessary for vinyl recordings. When a vinyl is recorded, the low frequencies are attenuated and the high frequencies are amplified. The phono input boosts the low frequencies and attenuates the high frequencies, producing a balanced sound.
A good choice is the Korg DS-DAC-10R, which has Phono and Line inputs, and a Line output to connect to your Hi-Fi amp.
If you have a real Hi-Fi, buy the best USB Audio Interface you can afford! (Which is not necessarily the most expensive one!)
You can record from any recording (input) device. MuRec also allows you to record from a playback (output) device, such as your speaker output. This means you can record anything that you can play, such as Internet streams, Deezer, iTunes, YouTube, BBC iPlayer, etc. For recording CDs you should use Matt's CD Ripper.
The 'Record From' list shows all the record (input) and playback (output) devices found on your system. A minimal system will show only the Speakers and the Microphone Array.
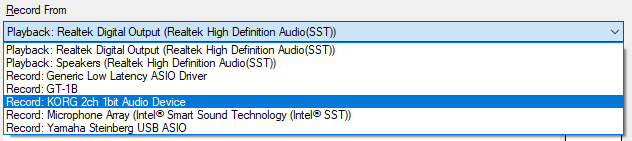
To record from an input device, just select it in the list. To record from an output (playback) device, select it in the list and you must also select the same device as the default playback device for your computer.
To select the default playback device in Windows 10, click on the 'speaker' icon on the task bar. This shows the current default device. Press the ^ button to select a different device. The default playback device must be the same as MuRec's 'Record From' device.

Alternatively, press the 'Sound Devices...' button on MuRec's main window. This opens Windows 'Sounds' dialog box. This has tabbed windows 'Playback' and 'Recording'. You can set the default playback device from the 'Playback' page. The default device is shown with a green tick (see below). To change the playback device, select it in the list and press the 'Set Default' button.

It also shows the channel's volume in the VU meter on the right, so you can see if it's registering any sound.
A digital input device usually has the volume set to 100, so you do not need to change it. If you have selected an output device such as Speakers of Headphones, it will record nothing if the volume is muted or is set very low, so you will need to adjust it until you see a good level in the VU meters and waveform. You can do a quick level-test recording to check it's ok.
The number of bits per sample defines the accuracy of the recording. Before starting recording, you should set the sample rate and bit depth for the recording or playback device.
The 'sampling rate' is the number of samples taken per second, measured in kiloHertz (kHz = thousands per second). Sampling rates are dependent on the computer hardware and can often be selected from the 'Recording' tab of the 'Sounds' dialog box. Select the device and press the 'Properties' button. The Properties dialog box of the device usually contains an 'Advanced' page. Here you will find a 'Default Format' group where you can select the sample rate and 'bit depth' (bits-per-sample).
CDs use a sampling rate of 44100 Hz (44,100 samples per second, or 44.1kHz) at 16-bits per sample. This is usually fine for MP3s. Hi-Fi users will probably prefer to sample at 96000 or 192000 Hz, 24 bits. Note that it does not make sense to save tracks at a higher sampling rate or bit-resolution than the digital source can produce, e.g. you will not gain any quality if you save a 16-bit recording as a 24-bit FLAC or WAV file.
When using the Track Editor to create music files, WAV and FLAC files are saved with the same sampling rate as the recording.

MuRec always records 32-bit IEEE Float format quality at the specified sampling rate, even if the input format is lower quality. When the recording file is edited using Matt's Track Editor, tracks can be saved in a more efficient format such WAV 16/24-bit, FLAC 16/24-bit or MP3.
MuRec always saves recordings as high-quality uncompressed 32-bit IEEE floating-point PCM files. The recording of one side of an album needs a file of up to 2 GigaBytes, depending on the sampling rate - that's up to 4GB for the whole album. MuMan uses the Broadcast Wave Format (BWF) for its WAV files if they are larger than 4GB. Standard .WAV files are limited to 4GB because of the 32-bit file size in the file's header. So MuRec is able to record terabytes in one file - but that's not recommended - try to limit a recoding to (say) max. 4 hours. The Track Editor can easy handle files of up to 10GB, but you may notice performance issues after this if your computer does not have the capacity.

1. Select the recording device as described above. Ensure the bits-per-sample and sampling rate are satisfactory using the 'Sounds' dialog box. The minimum should be 16-bits at 44.1kHz.
2. If recording from a playback device, make sure you have turned of any audio enhancements (see below). If you want to continue working on your computer while it's recording, also turn off the System Sounds (see below) so you don't record the beeps and other notifications.
3. Press the 'Start Recording' button. You may not see anything in the waveform view or VU meters until the recording or playback device is started. MuRec does not start recording if there is no sound. The button text changes to 'Stop Recording' and it flashes red while in record mode. Check the volume is at a suitable level by observing the waveform. If recording from an output device, you may need to adjust the volume if it's not set to '100'.
4. Start the recording or playback device, e.g. start playing your LP. You should see the audio waveform begin to scroll, and the VU meters show the volume. If the sound is too loud (over-sampling), the waveform and VU meters will flash red. If this happens, turn down the volume of the sound source until they are green, then press 'Stop Recording' and restart the recording from the beginning using the new volume.
5. Press the 'Pause Recoding' button if you want to skip parts of the recording. Press 'Resume Recording' to continue. Note that you can always edit out parts of the recording later using the Track Editor, so you don't often need to use the pause feature.
6. The recording will automatically pause if there is no sound for 10 seconds, or when the playback is finished, so you won't end up with a hard-drive full of recorded silence when you get back from the pub. You can remove recorded silence later with the Track Editor.
7. At the end, press 'Stop Recording' to save the file. The unique file name is created from the name of the recording device plus the date/time of the recording. The new file is added to the 'Recorded Files' list. Raw recording files are saved in a temporary directory called "d:\Users\<user-name>\AppData\Local\Temp\MuRip", and they are shown in the 'Recorded Files' list.
8. Double-click on the newly recorded file in the 'Recorded Files' list to open it in the Track Editor. Here you can split the huge recording file into separate tracks and save them in your preferred format, WAV, FLAC, WavPack or MP3, and optionally add them to your music library.
9. Once the Track Editor has saved the raw recording file as separate tracks, you can select it and press the 'Delete' button to move the huge recording file to the Recycle Bin.
IMPORTANT!! Always turn off audio enhancements before recording from a playback device!
When recording from a playback device, make sure that any 'sound enhancement' features are turned off. These are often applied before the sound output, so you will record the sound with the enhancement, and when you play it back it will be enhanced again! (But maybe this can sound interesting, so try it just for fun when you get back from the pub.)
For example, if recording from the Speakers, you may want to turn off 'Dolby Audio' while recording, if your computer has that feature:

Depending on the hardware and drivers installed on your computer, you may have a 'Digital Output' configured. The sound is [usually] sent to this output before any enhancements are applied, so this is the playback device you should normally use for recording.
When recording from a playback device, it's a good idea to turn off the System Sounds if you want to continue working on your computer. This will prevent you recording the beeps and other notifications you can get while using your computer. Do this as follows (Windows 10):
Right-click on the speaker icon in the task bar, and choose the 'Open Sound settings entry'. Or open 'Settings' and select 'Sound'. Scroll to the bottom and click on 'Advanced sound options'.

Turn the 'System sounds' volume to 0, and you're done:

Don't forget to turn the System sounds back on when you've finished recording (or not, if you find them annoying).
Recording from certain sources will infringe copyright regulations. Not paying for music prevents brilliant musicians earning enough money to continue making their music, and contributes to the deteriorating quality of modern music.
The rule is: If you like it, pay for it! If you use this software illegally, then we advise you to read Dante's Inferno (Eighth Circle, Bolgia 7) very carefully, and accept the dire consequences before you continue. Take care - music streaming sites know who you are! Digitizing your own vinyl and CDs, for your own use only, is OK.
If this software doesn't work, or if you are using it illegally, then we don't know who wrote it and it's got absolutely nothing to do with us. See Disclaimer.
If you find any problems, or have [polite] suggestions for improvements or missing features, please send us an email on info@muman.ch and we'll see what we can do.