|
<< Click to Display Table of Contents >> Introducing Matt's CD Ripper - MuRip® |
  
|
|
<< Click to Display Table of Contents >> Introducing Matt's CD Ripper - MuRip® |
|
"Ripping" has nothing to do with tearing off strips of wallpaper or splitting your trousers while dancing on the sofa (but trends suggest this is becoming more popular, preceded by the wallpaper bit). To rip a CD means reading the audio data from a CD and saving the tracks as digital audio files on your computer. Matt's CD Ripper has everything you need to obtain reliable digital copies of your CDs. Tracks ripped from the CD are saved in a selectable audio file format. If using Matt's Music Manager, the ripped tracks are automatically added to your music library.
Almost everyone who has used this app says it's the best CD Ripper they have ever used, so give it a try.

•Rips to FLAC, WAV, WavPack or MP3 formats (other formats available on request).
•Detects and indicates CD read errors.
•Waveform view to see where errors occurred, and play them to see if they're audible.
•Find CD artist, album and track details using MusicBrainz, FreeDB or Discogs Internet services.
•Barcode search feature, to find the CD by its unique barcode. You can also use the 'Discogs Catalog Number Search' feature on the 'Tools >' menu.
•Barcode reader which uses the computer's webcam to read the CD's barcode.
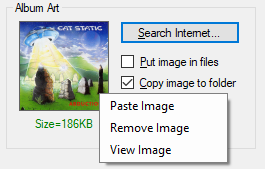
•Choose album art from Internet, embed images in the FLAC, WavPack or MP3 music files, or save high-resolution album art images in album directory.
•FreeDB Submit feature to add unknown CDs to the FreeDB database. (Currently this is only supported by "gnudb.gnudb.org", see Options 'FreeDB Server URL'.)
•Built-in CD player.
•Integrates perfectly with Music Manager, but can also be used stand-alone.
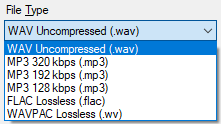
All files are 16-bits per sample at 44.1kHz, because that's the format of the data on the CD.
WAV Uncompressed
These files are large, typically 20-60 Megabytes. They contain the data exactly as it was on the CD, with no compression and nothing removed. You cannot embed the Album Art into a WAV file, but you can save the album art as a high-resolution JPG file in the album directory (AlbumArt.jpg), and Music Manager will use this file automatically.
Tip: Personally, I prefer the raw WAV files. They are safer and much easier to process than FLAC or WavPack files; they are supported by more software than FLACs; and you can easily convert them to any other format without any problems. These days, hard drive space is not a problem!
MP3 320 kbps
MP3 is a compressed format. Some harmonics and details are removed from the audio to make the file smaller. MP3 files can be over 70% smaller than the uncompressed WAV files. Some of the quality and depth of the sound is lost by the compression. This may be noticeable on a real Hi-Fi system, but most people can't tell the difference. MP3 320kbps should be the default format if you don't want huge lossless FLAC, WAV or WavPack files. The MP3 files created are "variable bit rate" files (VBR), up to 20% smaller than the fixed bit rate (FBR) versions, but with the same quality.
MP3 256 kbps, MP3 128 kbps
These are smaller than the MP3 320kbps, and a little more of the sound quality and depth is lost. But if the tracks are for playing on a mobile phone or MP3 player then you probably won't notice the difference.
FLAC Lossless
Many Hi-Fi enthusiasts use the FLAC format (Free Lossless Audio Codec) for their music files. FLAC files are compressed so they are about 20% smaller than the uncompressed WAV files, but no data or sound quality is lost. See https://xiph.org/flac/ for details. FLAC files are still very large, typically 15-40 Megabytes per track.
WAVPACK Lossless
WavPack files (.wv) are also lossless, and are slightly smaller than FLAC files, but are not so widely used. You can visit their website for details: https://www.wavpack.com/
Tip: Matt's Music Manager can be used to convert huge FLAC, WAV and WavPack files to much smaller MP3s for playing on your mobile devices later, see Export Tracks. This use the lossless file as the "master".
(Note: Almost any other file format can be supported if you give us a suitably large pile of cash.)
1) Start the CD Ripper from Music Manager via the "Audio Tools > CD Ripper" context menu command (F7), or by starting 'MuRip.exe'. You should see your CD drive letter on MuRip's title bar. If it's the wrong drive (e.g. your fancy computer has more than one CD drive), then press Options... and select the correct CD drive.
2) You can also choose the file path formats from the Options, but you must leave them as defaults if you are using Music Manager.
3) Insert the CD. The CD is examined, and the default Artist, Album and Track names are displayed, e.g. "Unknown Artist", "Unknown Album", "Track1", "Track1" etc. If you have ripped this CD before, then MuRip will recognize it and show the data you entered previously.
4) Edit the CD information manually, or press the FreeDB or MusicBrainz Search button to access Internet and search an online database for the CD information. If the CD is found in the database, you can select an entry and press OK to fill in all the CD information. If the information is not quite correct, you can modify it manually afterwards. Very often there will be more than one CD in the database that matches your CD, so select the one with the best quality information - check the spelling and capitalization. You can also enter the CD's barcode, and use the Barcode Search feature to find the CD.
5) If it's a 'Various artists' CD, there is only one 'Artist Name' which you may set to "Various Artists" or "Soundtracks" etc. You should check the Various Artists file name format option, and enter the track artist name in the Track Name field, separated from the track name by " / " , e.g. "All Along The Watchtower / Jimi Hendrix". If the 'Various Artists file name format' option is not checked, then the whole text is assumed to be the track name, and the track-artist name will be unknown.
6) Choose the file format you want to create (WAV, MP3, FLAC or WavPack), see above.
7) Choose the album art (the CD cover image). Once the Artist and Album names have been entered, press the 'Search Internet' button to do an image search and display the results in your browser. Choose an image and drag-and-drop it into the Album Art window. See Choosing Album Art.
8) Enter the destination folder (directory) where the artist and album subdirectories will be created. By default, the tracks are stored in a folder with this path: "destination_folder\artist_name\album_name". You can change the path from the Options... dialog box, "File Path Formats" tab. If you are using Matt's Music Manager, this should be your configured Music Files directory.
9) Select which tracks you want to rip, using the check boxes on the left. The default is all the tracks on the CD. Note that DATA tracks cannot be ripped, the checkbox is disabled.
10) Once everything is correct, press the "Let Rip" button to start. The progress indication tell's you what's happening.
MuRip has unique CD read error detection. Error counts are shown in the "Errors" column. If no errors are detected when reading the CD then you can be certain that you have a perfect copy of the audio.
A small number of errors distributed across a track, for example less than 200, can usually be ignored - they will not be audible. You can listen to the ripped track to check it. A large number of errors may cause annoying clicks or sections of silence. Sometimes ejecting and re-inserting the CD and re-trying the rip of the offending tracks will fix the problem. Some CDs contain attempted copy protection which makes it difficult to read them on a computer's CD/DVD drive.
After ripping a track, you can see where the errors occurred by pressing the Waveform... button to show the Waveform view. The locations of the errors are marked with red lines. You can click on the waveform to play the ripped sound at that point, and see if you can hear the errors. If not, then you can ignore them.
Sometimes "clipping" on the original recording may be interpreted as a read error. Clipping is where the maximum or minimum sound level is reached and the sound is limited to that value. Normally there should never be any clipping on a CD, unless it has been poorly mastered, but the occasional clipped peaks or troughs are usually not audible.
If the CD has minor scratches, finger prints or dirt on it, you can try cleaning it with a lens-cleaning cloth moistened with a mixture of 1-part water and 2-parts isopropyl alcohol. Gently rub the cloth from the centre of the CD to the edge, so it always moves at right-angles to the tracks. Never rub in a circular motion or parallel to the tracks. Make sure the CD is dry before you put it back in the drive!
See also Damaged CDs with fatal read errors.
If want to embed the album art (the CD cover image) in the files which you create (but not in WAV files), or save a high resolution image of the album art in the destination album directory so it can be displayed by Music Manager when you select or play the track, then you can choose the album art using an Internet picture search. See Choosing Album Art for details.
Ripping a CD may infringe copyright regulations, but if it's for your own use then it's probably OK. Listening to music may be illegal in some countries.
Tip: The consequences of stealing music may be more serious than you think, see Dante's Inferno (Eighth Circle, Bolgia 7) for details.
As usual, you use this so-called "software" at your own risk. But we use it a lot, and we've never had any trouble with it.
If you find any problems, or have [polite] suggestions for improvements or missing features, please send us an email on info@muman.ch and we'll see what we can do.
AccurateRip™ (see http://www.accuraterip.com) has not been fully implemented in MuRip because the AccurateRip track checksums only produce a "degree of confidence", and MuRip's own statistical error detection is good enough to detect audible read errors. AccurateRip produces different checksums from different pressings of the same CD, and even from the same CD ripped on different CD drives. It also requires the entire CD to be ripped every time. If there is a "low confidence" result from AccurateRip, then what do you do? Re-ripping the CD (a slow process) usually produces the same results, because the error may have been introduced in the factory, since audio CDs are not pressed with the highest precision.
MuRip only calculates the AccurateRip "ID", which is a link to a binary file that contains the checksum data for each track. You can see this path in the cdinfo.txt file.
From the http://accuraterip.com website: "AccurateRip furthers Audio CD ripping by verifying ripped tracks against an Internet database, making sure they are error free. AccurateRip is the only audio CD ripping technology which can verify extracted audio files are 100% free from errors, or put another way... no CD/DVD drive exists today which is able to self-detect errors 100% of the time (in PCs or CD players)."
Here's the full story (at the time of writing):
With AccurateRip, accuracy is determined by using a 'checksum' for each track. This is a simple 32-bit shift-and-add checksum, it is not a modern 'hash' or even a polynomial CRC, so it's not foolproof. There are complex problems with 'offsets' for different pressings of the same CD producing different checksums. Different CD/DVD drives can also produce different results for the same CD. To overcome this, each CD pressing, and even each CD drive model, has its own set of track checksums for each CD in the online database, one set for each offset (the worst case could be 2940 different sets for the same CD, but in practice it is far fewer than that). To use AccurateRip, you must always rip the entire CD so that these 'offsets' can be handled. The CD ripper should calculate all 2940 sets of checksums for each track, and see if any of these are in the database.
The accuracy of each checksum is determined by the number of tracks with the same checksum which are in the online database. A track with over 200 registrations of the same checksum is assumed to be 100% accurate. But only two applications are allowed to submit checksums to the online database (EAC and dBpoweramp), so it grows rather slowly. Many obscure CDs are not in the database, or do not have enough entries to be useful. If your CD is in the database, AccurateRip will only give you an approximation of the accuracy, they call it a "degree of confidence".
If the rip produces a different checksum, then what do you do? Ripping it again (a long process) usually produces the same result. This is because the errors are often introduced in the factory - they may be in the pressing itself - so re-reading it just reads the same data. If the error is from a scratch, re-ripping the CD will probably not work either. A checksum can change if just one bit is different, and theoretically you could get the same checksum if many bits are different (this is more likely if the database contains many checksums for the same track).
Since the CD drive itself does its own error correction, and MuRip is able to detect uncorrected read errors (see 'Rip error detection' above), then you don't really need AccurateRip. If the error is not detected, then you can guarantee that it will not be audible, so a 100% perfect digital copy of an analogue source is not necessary, especially if you are saving it in a lossy MP3 format. In our experience, even if MuRip detects many minor errors in the digital data, they are usually inaudible after conversion to an analogue signal.
This application uses the Discogs API but is not affiliated with, sponsored or endorsed by Discogs. "Discogs" is a trademark of Zink Media, LLC.